Overview
LINE WORKS provides a message bot available in a message room.
You can use bots with various other systems.
How a bot works {#how-bot-works}
A bot can directly interact with LINE WORKS users. Using the Bot API, you can make a bot send messages to users from the customer's message server and automatically reply to their messages.
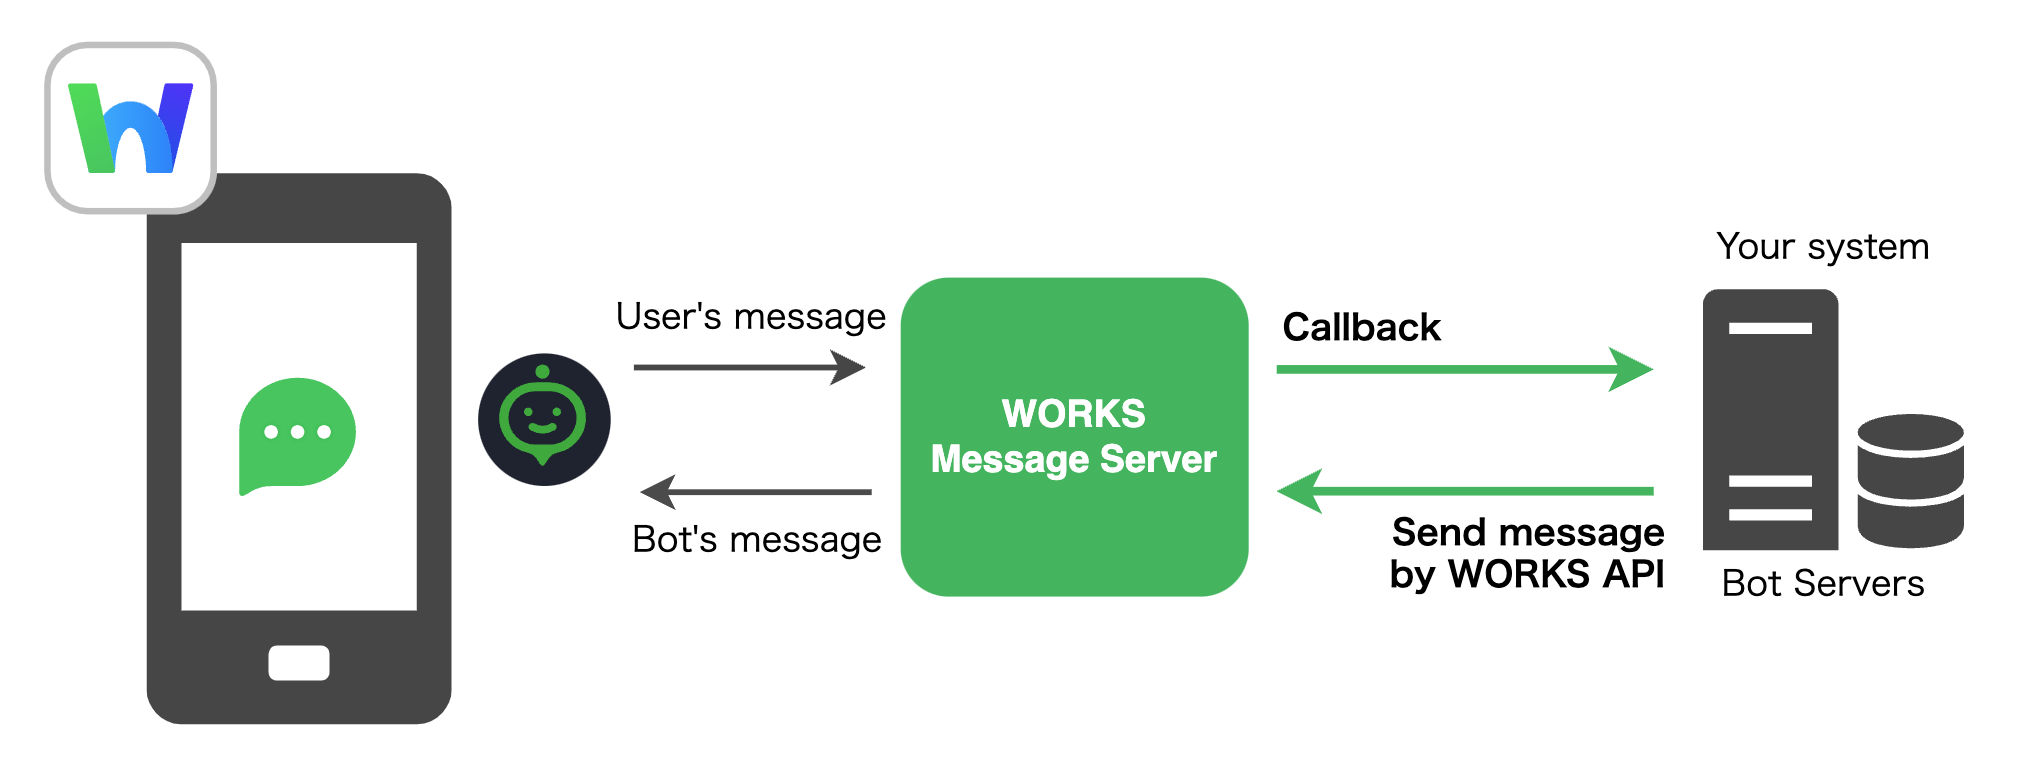
LINE WORKS provides bot interfaces, which are used to exchange data with the customer's message server.
Send messages {#send-message}
A bot can send messages using the "Bot API."
Both a reply to a user's message and a message sent by a bot are not differentiated and are thus handled using "Send messages."
If there are more than 500 members in a message room, sending messages works, but push notifications do not.
For more information, see Bot API.
Receive messages {#receive-message}
Messages sent from users are sent to the customer's message server.
When creating a bot, you need to set the customer's message server URL (HTTPS) for the callback URL. Depending on the type of sent messages, a JSON-formatted callback event is sent to the URL.
Only one callback URL can be added for a bot.
For more information, see Receive Messages (Callback).
What you can do with a bot {#features}
Interact with users {#feature-talk-room}
A bot can participate in a 1:N as well as 1:1 message room, enabling interaction with multiple users. Note that a bot is not available for a message room with external users (LINE or external LINE WORKS users).
The types of messages that a bot can receive from users are as follows:
- Text
- Sticker
- Photo
- File
- Share location
- Audio
- Video
Send various types of messages {#feature-message}
A bot can send various types of messages, including text, stickers, and files.
The types of messages that a bot can send are as follows:
- Text
- Sticker
- Image
- File
- Link
- Button template
- List template
- Carousel template
- Image carousel template
- Flexible template
For more information, see Message Types.
You can send messages using the Bot API. For more information, see Bot API.
Menus {#feature-menu}
You can use menus to communicate with a bot. Menus are displayed in the text box, enabling various actions.
- Persistent menu
- Rich menu
For more information, see Menus.
Various actions {#feature-action}
You can specify a bot's action that will occur when a user presses a button or an image on a message.
- Postback action
- Message action
- URI action
- Camera action
- Camera roll action
- Location action
- Copy action
For more information, see Action Objects.
Create a bot {#create-bot}
Follow the steps below to add a bot. You can add up to 300 bots.
- Add a bot in Developer Console: Add a bot to the LINE WORKS tenant.
- Add a bot in the LINE WORKS Admin: Add a bot to the LINE WORKS domain.
Note
- A tenant consists of one or more LINE WORKS domains. It is a concept for a group of companies.
- A bot added in the Developer Console is added to the tenant. To add the bot to each domain, the administrator must add it in the LINE WORKS Admin.
You can also add a bot using the Bot API. For more information, see Bot API.
1. Add a bot in Developer Console {#step-one-add-to-tenant}
From Bot in the Developer Console, you can add, edit or delete bots.
Click Register on the upper right side of the page, add the following information and save the changes.
| Field | Description |
|---|---|
| Profile image | (Optional) Bot's profile image file |
| First name | (Required) Bot name. A line break in a bot name is treated as a blank space. |
| Description | (Required) Bot description |
| Callback URL | Select On to receive a message (callback). If it is On, specify the URL (HTTPS only) to receive callback events and select the types of messages that users can send. Caution: For the callback URL, a self-signed certificate is not allowed for security reasons. To see the list of allowed certificate authorities, see CA List. |
| Bot Policy > Join Chat Room | Set whether to allow a bot to join a 1:N message room. |
| Person in charge > PIC | (Required) Primary contact |
| Person in charge > Vice PIC | (Optional) Secondary contact |
Once a bot is added, the following values are created.
| Field | Description |
|---|---|
| Bot ID | Bot identifier. It is the same as the "Bot No" in the bot list displayed in the LINE WORKS Admin, which is required to use the Bot API. |
| Bot Secret | Secret information used to verify the signature. For more information, see Receive Messages (Callback). |
A bot added in the Developer Console is added to the LINE WORKS tenant. A bot must be added in the LINE WORKS Admin to be available to users.
Bot status {#bot-status}
You can check the status of each bot on the bot list in the Developer Console. The status of a bot can be one of the following:
| Status | Description |
|---|---|
| Preparing | |
| Public | The bot has been added in the LINE WORKS Admin and is running now. It can send messages to users. |
| Public (action required) | The bot has been added in the LINE WORKS Admin and is running now but requires additional confirmation Check the details on the bot details page. |
2. Add a bot in LINE WORKS Admin {#step-two-add-to-domain}
In the LINE WORKS Admin, add the bot that has been added in the Developer Console to the LINE WORKS domain.
For how to add a bot in the Admin, see Bots in Administrator Guide.